Fixing a leaky two-handle kitchen faucet might seem a bit daunting at first, but it’s quite straightforward once you know what you’re doing. The root cause of most leaks in these faucets usually boils down to worn out parts like cartridges, washers, or O-rings. Understanding these components can make your task a lot easier.
When you’re dealing with a two-handle faucet, focus on the key components: the cartridges, the seat washers, and the O-rings. These parts are crucial as they form the main sealing components that control water flow. Over time, these parts can wear down or become loose, leading to annoying drips. Common culprits include a worn-out cartridge, seat washer, or O-ring, which are usually easy and inexpensive to replace.
Before diving into the repair, gather all the necessary tools: an adjustable wrench, flathead and Phillips screwdrivers, and an Allen wrench if your model needs it. You’ll also need replacement parts like cartridges or washers and some plumber’s grease to lubricate the new components properly. Having a towel or bucket handy can prevent water spills and keep your workspace tidy.
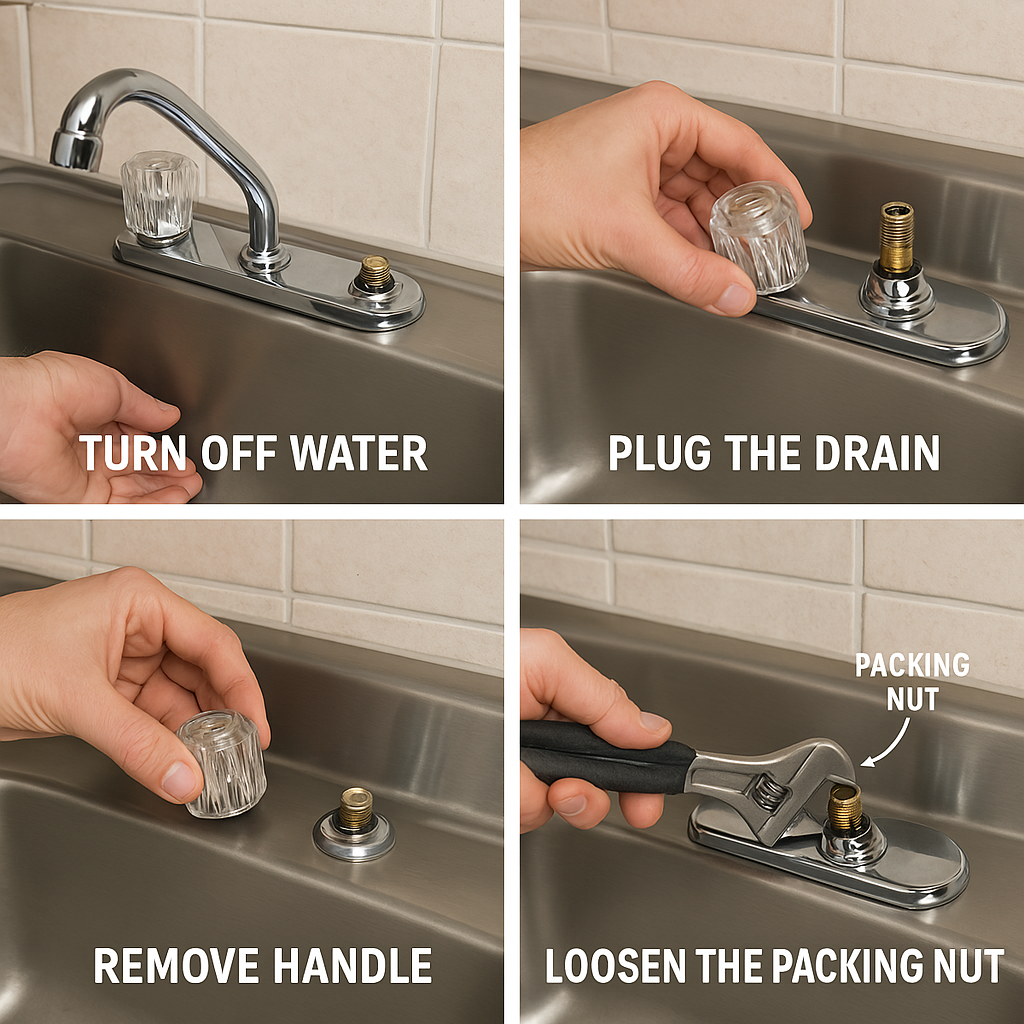
Quick repair steps go a long way in tackling drips effectively. Start by turning off the water supply at the shut-off valves under your sink. Protect your parts from getting lost by plugging the drain. Carefully remove the faucet handle by unscrewing the top cap or set screw. Once the handle is off, loosen the packing nut with a wrench and pull out the stem or cartridge. Inspect the rubber washer at the bottom and the O-rings – replace them if they show signs of wear or damage.
Having replaced all the necessary parts, apply some plumber’s grease to ensure smooth operation and prevent future leaks. Reassemble the faucet and tighten everything securely. Once your water’s back on, check for any continuous drips or leaks around the handle. This ensures you’ve snugly fit all parts back together.
If the faucet still leaks after you’ve finished the usual checks, it might be worthwhile revisiting each step to ensure no errors were made. Regular maintenance of your faucet is crucial to prolong its life and ensure smooth, leak-free operation. Small measures like routinely checking and replacing worn washers or O-rings can spare you bigger headaches down the line.
🚰 Tackling the Drip: Fixing a Leaky Single-Handle Kitchen Faucet with Ease
Beyond the two-handle models, single-handle faucets can be just as prone to pesky drips. They usually require attention to the cartridge and O-rings, which are integral to preventing leaks and ensuring smooth water control. Recognizing these components and their functions simplifies the troubleshooting process.
The most typical causes of leaks in single-handle faucets are worn-out cartridges and deteriorated O-rings. These elements are essential for maintaining a watertight seal inside the faucet mechanism. An occasional tap at the faucet won’t solve underlying wear and tear, so timely replacements are key to solving leaks.
Before you begin the repair, get equipped with the necessary tools: Allen wrench, screwdrivers, slip-joint pliers, and a cartridge puller if your model requires one. Replacement cartridges should match your faucet model, ensuring a snug fit that prevents future leaks. Also, have plumber’s grease on hand to lubricate components properly, easing installation and functioning.
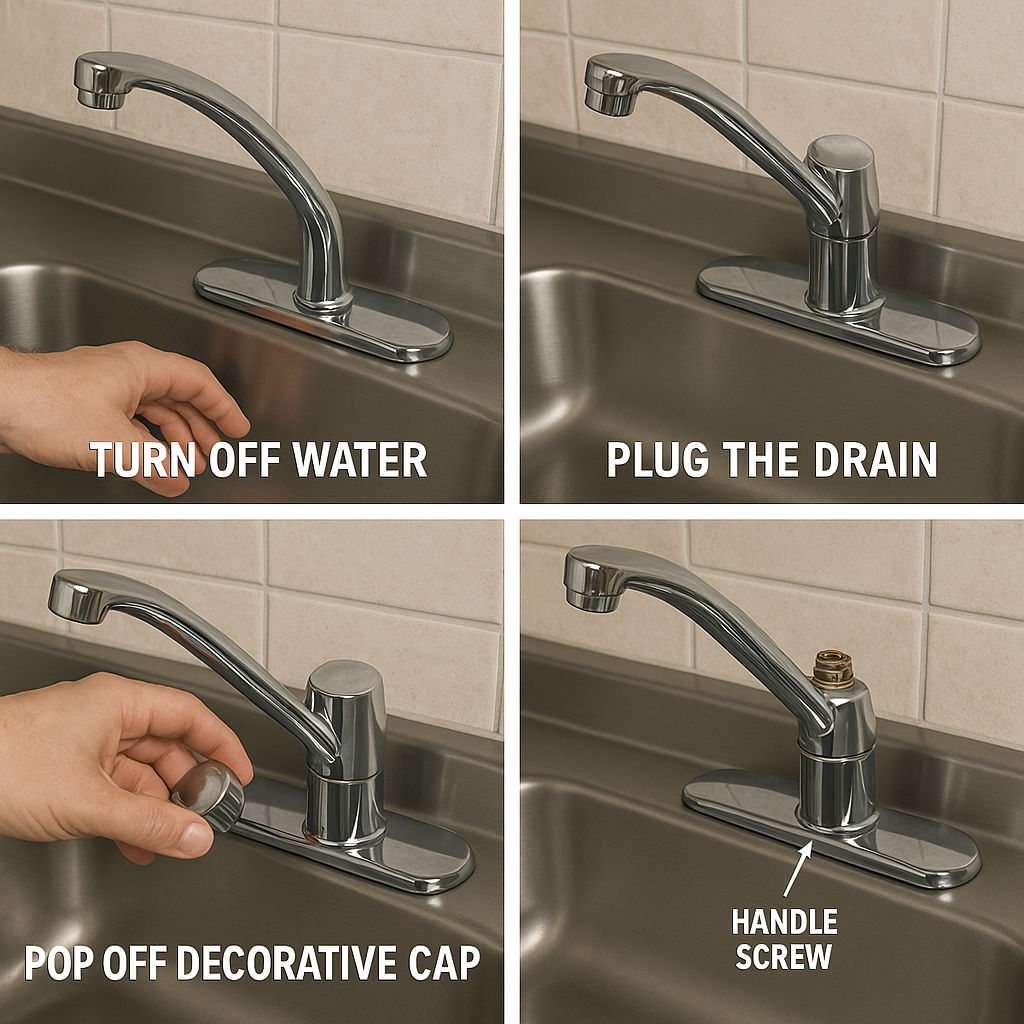
Start by turning off the water supply and plugging the sink drain to keep small parts from slipping away. Pop off the decorative cap on your faucet’s handle and remove the handle screw – you’ll likely need an Allen wrench for this. Lift the handle up and off, giving you access to the inner workings.
With the handle removed, unscrew the retaining nut and pull out the existing cartridge using slip-joint pliers or a cartridge puller. Inspect it thoroughly for signs of wear or cracking. If damaged, replace it with a new, identical cartridge. It may be the older style steel ball valve, just acquire the matching kit and install it. Applying a dab of plumber’s grease to the new cartridge ensures smooth operation and effective sealing.
Once everything’s in place, reassemble the faucet step-by-step: tighten the retaining nut, secure the handle back on, and reattach the decorative cap. Turn the water back on and conduct a quick check to confirm the leak is history and water flows as it should.
Regular maintenance plays a vital role in extending the lifespan of your single-handle faucet. Keeping an eye on the parts and addressing any wear promptly will spare you from frequent drips and save water. Following these proactive steps means your faucet will function perfectly for years to come, leaving no room for the dreaded drip.